The Dread of Off-Flavors
If you brew long enough, you eventually meet the one thing every homebrewer dreads: an off-flavor you cannot ignore. It does not matter whether you are brewing your first extract kit or dialing in your fiftieth all-grain batch. At some point, a beer is going to throw you a curveball. Green apple where there should not be green apple. Butter that does not belong. A whiff of something that reminds you of a barnyard, a sock drawer, or the inside of a vomitorium.
The first time it happens, it is frustrating. The second time, it is educational. By the third, you start realizing that off-flavors are not just mistakes. They are information. Every strange aroma or unexpected flavor is the beer sending up a flare, saying, “Something happened back there, go find it.”
Mistakes aren’t failures, they’re tuition.
I am a big believer that most brewing lessons are earned, not handed out. Nothing teaches quite as fast, or as effectively, as getting your nose into a beer that is not behaving. I still remember the first time my homebrew club ran through the complete Siebel Institute off-flavor kit together. I have now done that panel three times, and each time reinforces two things for me. First, I still have blind spots. Second, my palate gets better with practice.
Those little glass vials are like smelling salts for the beer brain. You do not forget what butyric acid smells like. You do not forget mercaptan. And once you have smelled acetaldehyde in its pure form, you will never miss it again in a finished beer.
To make this easier for brewers who do not have access to tasting panels, I created an infographic titled “Off-Flavors in Beer: A Brewer’s Quick Reference Guide.” It is built to live on your wall, your brew-day clipboard, or right next to your fermenter. The guide gives you the quick version of each major off-flavor, what it tastes like, where it comes from, and the most common causes. As you read through this article, keep that guide in mind. Think of it as the field manual, while this piece serves as the whole textbook.
So let us break this down. What exactly are off-flavors in beer, and why do they show up in the first place?
What Are Off-Flavors in Beer?
Before we dig into the long list of specific off-flavors, it helps to understand what we are actually talking about. Off-flavors in beer are any tastes or aromas that do not belong in the style you are brewing. Some are unmistakable, like the skunky taste of Corona, or the buttery richness of a Chardonnay. Others are subtle, only appearing when the beer warms. Either way, these flavors are signals. They tell you something went sideways somewhere between milling grain and pouring the final pint.

It is important to remember that brewing is a chain. Every step in the process affects the next one. A fermentation that is a few degrees too warm, hops that sit too long with oxygen exposure, a sanitizer that does not rinse cleanly, wort that cools more slowly than planned, all of these choices can show up later as a distinct off-flavor. Once you train your palate to recognize them, you begin to spot patterns and troubleshoot your beer with absolute confidence.
But I like Brett.
Plenty of classic styles intentionally include things that would be problems elsewhere. German hefeweizens lean into clove-like phenolics. Belgian ales celebrate fruity esters. A touch of sulfur in certain lagers is not unusual. The difference between an intentional flavor and an off-flavor is almost always a matter of context and intensity. If you taste bubblegum in your American pale ale, something is wrong. If you taste it in a Belgian tripel, you are probably right where you should be.
This is why sensory training matters. Being able to distinguish how much of a flavor is appropriate and why it is there is key to improving as a brewer. The off-flavor kit tastings I have done over the years drove this home. When you taste acetaldehyde on its own at a clear and unmistakable concentration, it sticks with you. The next time you encounter even a whisper of that green apple note in one of your beers, you recognize it immediately. You start asking the right questions. Did I rush fermentation? Did I pitch enough healthy yeast? Did I accidentally introduce oxygen where I shouldn’t have?
Why we made this guide
Below, we will walk through the major off-flavors brewers encounter, what they taste like, what causes them, and how to prevent them. Keep your reference infographic nearby as you read through this section. The infographic is the quick-hit cheat sheet, and this is the long-form companion.
Let us start with the heart of the issue, fermentation. Few parts of brewing have as much influence over the final beer, and few mistakes show up more loudly in the glass.
Fermentation-Driven Off-Flavors
If there is a single stage of brewing that creates the most significant flavor swings, it is fermentation. Yeast health, pitch rate, oxygen levels, temperature control, and timing all play enormous roles in what ends up in the glass. When something goes wrong here, it usually reveals itself quickly. Fermentation problems can produce bright green apple notes, harsh solvent qualities, buttery slickness, barnyard funk, rotten egg aromas, or fruity esters that are wildly out of place for the style.
These flavors often seem mysterious at first, but once you understand what yeast is capable of, they begin to make sense. Yeast is not just eating sugar and making alcohol. It produces dozens of compounds that shape a beer’s character. Some of those compounds make a beer expressive and complex. Others send it straight into the troubleshooting category.
Below are the most common fermentation-driven off-flavors, what they taste like, why they happen, and how to prevent them.


Acetaldehyde
- Tastes and aromas: green apple, cut grass, raw pumpkin
- Source: incomplete fermentation or stressed yeast
- Why it happens:
Acetaldehyde is a natural intermediate compound in fermentation. Healthy yeast converts it into ethanol at the tail end of the process. When fermentation is rushed or underpitched, acetaldehyde remains in the beer. Oxygen exposure after primary fermentation can also regenerate acetaldehyde from ethanol, which brings the flavor back even after it seemed to disappear. - How to avoid it:
Give your beer time to finish. Use fresh, healthy yeast, oxygenate properly before pitching, and avoid oxygen exposure once fermentation is underway. In most cases, time and stable temperatures will allow yeast to clean up the remaining acetaldehyde.
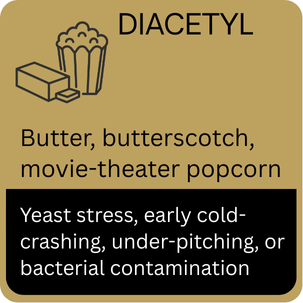
Diacetyl
- Tastes and aromas: butter, butterscotch, movie theater popcorn, slick mouthfeel
- Source: yeast metabolism, contamination, or cold crashes that were too abrupt
- Why it happens:
All yeast creates diacetyl, but healthy yeast reabsorbs it before fermentation is complete. Problems arise when the yeast flocculates early, becomes stressed, or lacks nutrients. Low fermentation temperatures, weak yeast vitality, and abrupt temperature drops can leave diacetyl behind. Bacterial contamination can also generate large amounts. - How to avoid it:
Pitch enough yeast, keep fermentation temperatures steady, and allow a proper maturation period. Many brewers use a slight temperature rise near the end of fermentation to ensure reabsorption. Avoid cold crashing until fermentation is fully complete.
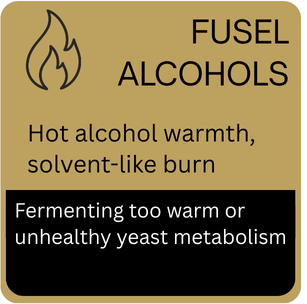
Fusel Alcohols (Hot Alcohol or Solvent-Like)
- Tastes and aromas: harsh heat in the throat, solvent, warming but not in a pleasant way
- Source: high fermentation temperatures or stressed yeast
- Why it happens:
When yeast ferments too warm, it increases the production of fusel alcohols such as propanol and butanol. These compounds are acceptable in small amounts in high-gravity styles, but in most beers, they show up as sharp, solvent-like heat that overwhelms the malt and hops. Underpitched yeast and insufficient oxygenation can make the issue worse. - How to avoid it:
Keep fermentation temperatures consistent and within the recommended range for your yeast strain. Use adequate pitch rates, oxygenate high-gravity worts, and avoid letting fermentation temperatures drift into the upper range.
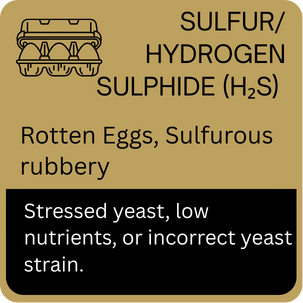
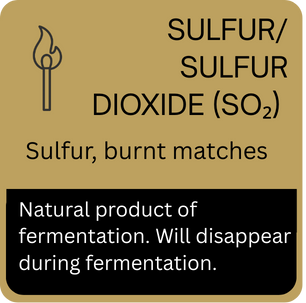
Sulfur and Hydrogen Sulfide (H₂S)
- Tastes and aromas: rotten egg, struck match, sewage
- Source: natural yeast byproduct, especially in lagers
- Why it happens:
All yeasts produce hydrogen sulfide, although lager strains tend to generate more of it. In many cases, the aroma vents out naturally during fermentation. Problems occur when fermentation is slow, when yeast is stressed, or when the wort lacks nutrients. Poor off-gassing in closed fermentation systems can also trap the aroma. - How to avoid it:
Use proper yeast nutrition, ensure adequate oxygenation at pitch, and maintain steady fermentation temperatures. Allow lagers adequate conditioning time, as sulfur compounds tend to fade over time and during cold storage.
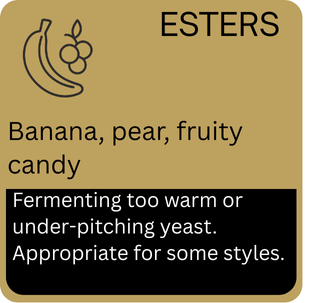
Estery or Fruity Aromas in the Wrong Style
- Tastes and aromas: banana, pear, bubblegum, stone fruit, citrus
- Source: naturally produced by yeast, amplified by warm fermentation or underpitching
- Why it happens:
Esters are the aromatic signature of many ale strains, and in styles like Belgian ales or hefeweizens, they are part of the charm. In styles that should taste clean, however, fruity esters can feel distracting. Esters increase when yeast ferments at warm temperatures or when cell counts are lower than ideal. - How to avoid it:
Pitch enough yeast, oxygenate properly, and maintain a cool, stable fermentation temperature. When brewing a clean-drinking style like a lager or American ale, keep fermentation toward the lower end of the temperature range.
Indole (Barnyard or Farmyard)
- Tastes and aromas: barnyard, manure, animal-like
- Source: poor yeast health or contamination
- Why it happens:
Indole can appear when yeast is severely stressed or when the beer becomes contaminated with wild microbes. In rare cases, specific yeast strains may produce trace amounts, but in most beers, it is a clear sign that something went wrong. - How to avoid it:
Focus on sanitation, pitching rates, nutrient levels, and temperature stability. If indole appears, review your yeast handling closely. It indicates that the batch was vulnerable to either stress or contamination.
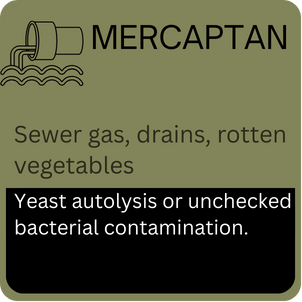
Mercaptan (Skunky)
- Tastes and aromas: sewage, drains, skunky without light exposure
- Source: sulfur compounds reacting with other beer components
- Why it happens:
Mercaptans develop when certain sulfurous fermentation byproducts interact with other compounds in the beer. Although mercaptan is often associated with light-struck beer, it can appear without UV exposure if yeast is stressed or if fermentation temperatures drift. - How to avoid it:
Use healthy yeast and maintain proper fermentation temperatures. If your beer develops mercaptans, adequate conditioning time may reduce their intensity, though not always.
These fermentation-driven off-flavors often feel intimidating when you first encounter them, but they all connect back to a simple principle. Healthy, well-fed yeast working at the right temperature will produce clean, expressive beer. Stressed, underpitched, or overheated yeast will not.
With fermentation covered, the next major group of off-flavors comes from ingredients. Grain, hops, water, and storage conditions all leave their fingerprints on a finished beer, sometimes in ways you do not expect.
Ingredient-Related Off-Flavors
Once you have fermentation under control, the next place off-flavors tend to hide is in the ingredients themselves. Grain, hops, water, and storage practices all shape the final beer. When something is stale, oxidized, poorly stored, or overused, it shows up quickly in the glass. Ingredient-based off-flavors often feel less dramatic than fermentation faults, yet they can be just as distracting. They usually take the form of grassy notes, husk-like bitterness, waxy or cheesy aromas, or the unmistakable taste of stale malt. These are easier to diagnose because they connect directly to the raw materials used in the beer.


Grainy or Husky
- Tastes and aromas: raw grain, husk, a drying or rough finish
- Source: over-milled grain, husk damage, highly toasted malts, or harsh sparging
- Why it happens:
When grain is crushed too fine, the husk breaks down, releasing tannin-like compounds that create a dry, harsh finish. Over-toasted or improperly stored grain can add similar flavors. Long or overly hot sparging can also pull harsh polyphenols from the husk. - How to avoid it:
Use a proper mill gap that cracks the grain without shredding it. Store your grain in a cool, dry space. Avoid sparging with overly hot water, and stop sparging when the runoff becomes thin or astringent.
Grassy
- Tastes and aromas: freshly cut grass, hay, musty plant matter
- Source: stale malt, improperly stored hops, or aldehydes in old ingredients
- Why it happens:
Malt and hops degrade over time, especially when exposed to heat or oxygen. As grains age, aldehydes form, creating sharp, grassy flavors. Hops can develop the same character when exposed to moisture or stored without proper packaging. - How to avoid it:
Buy fresh ingredients and store them well. Keep grain sealed and dry. Store in cold, oxygen-reduced packaging. If you grow your own hops, dry them thoroughly before storage.
Caprylic Acid
- Tastes and aromas: soapy, fatty, candle wax
- Source: oxidized lipids from old grain or yeast autolysis
- Why it happens:
Fatty acids naturally occur in malt and yeast. As beer ages or ingredients oxidize, these acids break down into waxy or oily flavors that sit heavily on the palate. - How to avoid it:
Use fresh grain and avoid long warm storage of finished beer. Limit oxygen exposure during packaging and keep beer cold once it is carbonated.
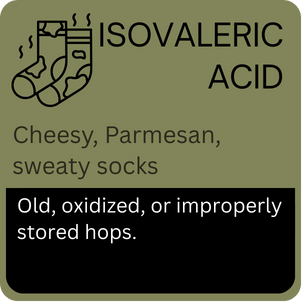
Isovaleric Acid
- Tastes and aromas: old cheese, parmesan rind, sweaty socks
- Source: aged hops that have oxidized or degraded
- Why it happens:
As hops age, their alpha acids break down into cheesy and pungent compounds. This is not the pleasant funk you sometimes find in intentional aging. This is an unmistakable cheese note that overrides the hop profile. - How to avoid it:
Use fresh hops and store them cold. Avoid hops that smell cheesy out of the bag. If you are using whole cones, make sure they are dry, clean, and properly packed.
Spicy or Phenolic
- Tastes and aromas: clove, allspice, herbal warmth
- Source: yeast-derived phenols, or occasionally, grain and water chemistry
- Why it happens:
Phenols are more commonly tied to fermentation, but ingredient choices can enhance them. Wheat malts, high-mineral water, or certain yeast strains can push spicy notes beyond their intended range. - How to avoid it:
Choose yeast appropriate for the style and monitor your mash pH and grist composition. If you do not want clove or spice in your beer, avoid strains known for phenolic expression.
Papery or Oxidized
- Tastes and aromas: cardboard, old books, stale bread
- Source: oxygen exposure during ingredient storage or packaging
- Why it happens:
Both malt and hops degrade in the presence of oxygen. Paper or cardboard flavors are especially common in older malt extract, stale base malt, or beer that picked up oxygen after fermentation. - How to avoid it:
Store all ingredients in airtight packaging. Avoid exposure to oxygen during packaging and keep finished beer cold.
Metallic
- Tastes and aromas: iron, tin, blood, penny-like sharpness
- Source: contact with reactive metals or iron-rich water
- Why it happens:
Metallic flavors come from brewing equipment made of unprotected steel or aluminum. Water with high iron content can contribute the same flavor. Old or improperly stored grains can also pick up metallic notes. - How to avoid it:
Use stainless steel equipment whenever possible. Avoid unlined steel and be cautious with aluminum unless it has developed a stable oxide layer. Use filtered or tested water with low iron content.
Earthy
- Tastes and aromas: soil, dirt, geosmin
- Source: contaminated grain, old hops, or wild microbes
- Why it happens:
Grain stored in damp environments or hops exposed to moisture can pick up earthy, soil-like flavors. Microbial contamination can also cause similar aromas. - How to avoid it:
Keep grain and hops dry, cool, and sealed. Inspect ingredients before use. If anything smells off in the bag, trust your nose and replace it.
Ingredient-related off-flavors often stem from freshness and storage. Brewing rewards those who take ingredient quality seriously. Once your ingredients are dialed in, the next set of issues usually comes from the hot side of the process. Boiling, chilling, and handling the wort all create opportunities for flavors to drift in the wrong direction.
Boil and Hot-Side Off-Flavors
After ingredient quality, the next major category of off-flavors comes from the hot side of brewing. The mash, boil, and chilling stages lay the foundation for fermentation, and any issues here tend to lock in to the wort long before yeast gets involved. Hot-side off-flavors often come from poor boil vigor, long cooling times, tannin extraction, or light exposure. These flavors can feel baked in because once they appear, they are nearly impossible to remove later.
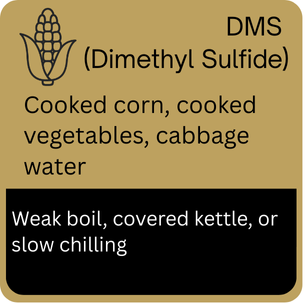

Dimethyl Sulfide (DMS)
- Tastes and aromas: cooked corn, cabbage, tomato broth, stewed vegetables
- Source: SMM compounds in malt that convert to DMS during heating
- Why it happens:
Pale malts naturally contain S-methyl methionine, which breaks down into DMS during the boil. A proper rolling boil vents DMS out of the kettle. When the boil is weak, covered, or interrupted, DMS condenses and drips back into the wort. Slow chilling can also keep wort hot enough for SMM to continue converting, long after the heat is turned off. - How to avoid it:
Maintain a vigorous, uncovered boil for at least an hour. Chill the wort quickly to prevent conversion from continuing. Avoid letting condensation fall back into the kettle. Good wort movement and fast cooling are your friends here.
Astringency
- Tastes and aromas: tannin, drying bite, tea bag character, chalky harshness
- Source: oversparging, high mash pH, or excessive grain husk extraction
- Why it happens:
Astringency comes from polyphenols that leach out when grain is rinsed with very hot water or when the mash pH drifts too high. The effect tends to feel mouth-drying, the same way over-steeped tea does. It can also appear when the boil concentrates tannins from dark malts or fruit skins. - How to avoid it: Monitor your mash pH and keep it in the ideal range. Avoid sparging with excessively hot water. Stop collecting wort when the gravity drops too low. Treat fruits gently and, when possible, avoid boiling them.
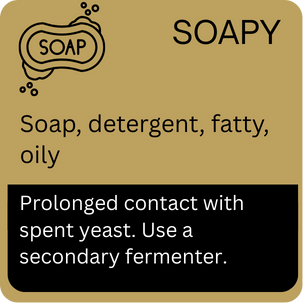
Soapy
- Tastes and aromas: soap, detergent, fatty residue
- Source: prolonged contact with trub, or broken-down fatty acids
- Why it happens:
While technically more of a fermentation issue, soapy flavors often start with hot-side handling. Extended contact with hot break material and trub can release fatty acids that later convert into soapy compounds. The issue becomes more apparent if the beer sits on trub for an extended time after fermentation. - How to avoid it:
Be deliberate with transfers. Leave most of the trub behind when moving the wort into the fermenter. Once fermentation is complete, do not let the beer sit on the sediment for too long.
Light-Struck
- Tastes and aromas: skunk, burnt rubber, musty sulfur, mercaptan
- Source: UV light exposure reacting with hop compounds
- Why it happens:
Iso-alpha acids in hops react with ultraviolet light to create mercaptan, the same compound that skunks spray. This can appear even before fermentation if the kettle or transfer vessel sits in the sun or under fluorescent light. Light-struck beer is irreversible and easily one of the most recognizable off-flavors. - How to avoid it:
Protect wort and beer from UV light at all stages. Use brown bottles instead of green or clear. Shield your fermenter with a towel or bag if it is translucent.
Wort Caramelization or Scorching
- Tastes and aromas: burnt sugar, harsh caramel, singed edges
- Source: excessively high heat on the kettle bottom or thick wort layers
- Why it happens:
When wort sits still on a hot surface, the sugars caramelize or burn. High-gravity brews are especially vulnerable because the wort is thicker. Some caramelization is intentional in certain styles; uncontrolled scorching results in harsh, sharp flavors. Burnt toast is not a great flavor in beer. - How to avoid it:
Stir well during the heating phase. Use adequate burner control. Avoid letting thick wort accumulate on the bottom of the kettle. Consider upgrading your kettle to one with better heat distribution if this is a recurring issue.
Sanitation and Microbial Off-Flavors
Once the wort leaves the boil kettle, it enters the most vulnerable stage of the entire brewing process. At this point, the wort is cool enough for microbes to thrive, and yeast has not yet taken control. Any lapse in sanitation, any scratched plastic fermenter, any poorly rinsed hose, or any wild yeast drifting into the fermenter can introduce flavors that no amount of conditioning will fix. Sanitation-related off-flavors are some of the most unmistakable, and unfortunately, the most difficult to correct.
Contamination
- Tastes and aromas: sourness paired with butter, odd combinations of dairy and tartness
- Source: unwanted bacteria or wild yeast
- Why it happens:
Wild yeast love it when you don’t sanitize properly. These microbes produce acids, diacetyl, phenols, and other compounds that do not belong in clean beer styles. Contamination often causes multiple off-flavors simultaneously. - How to avoid it:
Clean thoroughly before sanitizing. Keep all post-boil surfaces sanitized. Minimize exposure to air. Avoid using scratched plastic equipment, as microbes can hide there. Replace old buckets when needed.
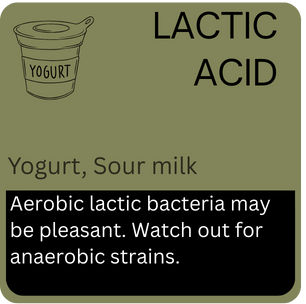
Lactic Acid
- Tastes and aromas: tangy acidity, yogurt, sour milk
- Source: Lactobacillus or Pediococcus contamination
- Why it happens:
Although desirable in intentionally soured styles, lactic acid is a fault in clean beers. These bacteria thrive in warm, sugary environments. If they enter the beer before yeast takes hold, they quickly outcompete the brewing yeast and turn the beer sour. - How to avoid it:
Sanitize anything that comes into contact with wort below 180 degrees. Seal fermenters tightly. Make sure starter vessels, transfer lines, and bottling equipment are properly cleaned and sanitized.
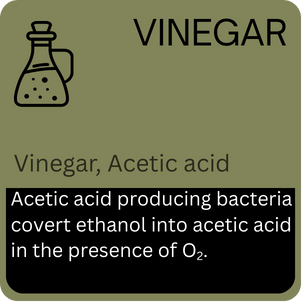
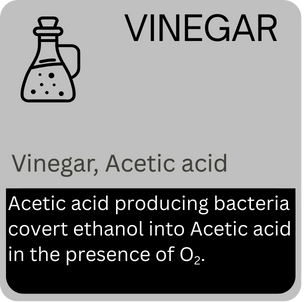
Acetic Acid
- Tastes and aromas: vinegar, sharp acidity, acidic bite
- Source: Acetobacter contamination in the presence of oxygen
- Why it happens:
Acetobacter turns ethanol into vinegar, but only when oxygen is available. This usually means the beer was exposed to air during fermentation or storage. Combined with oxygen intrusion, this bacterium can completely overwhelm the beer. - How to avoid it:
Maintain airtight fermentation. Keep airlocks filled. Limit oxygen contact during transfers. Do not splash or shake fermented beer.
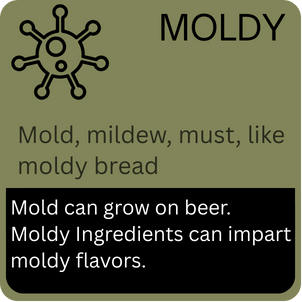
Moldy or Musty
- Tastes and aromas: mildew, damp cupboards, stale basement
- Source: mold growth on ingredients or inside fermentation vessels
- Why it happens:
Mold grows in damp and humid spaces. Grain stored improperly, extract kept in warm environments, or fermenters left in wet areas can quickly develop mold. Once mold becomes visible in a fermenter, the beer is almost always compromised. - How to avoid it:
Store ingredients in cool and dry conditions. Keep fermenters in clean, dry locations. Inspect all ingredients before use. If anything smells musty before brewing, do not use it.
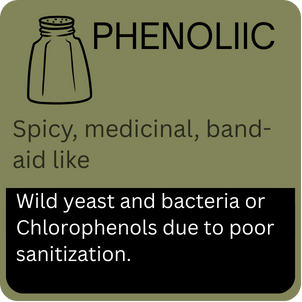
Phenolic or Medicinal
- Tastes and aromas: bandages, plastic, smoke, mouthwash
- Source: wild yeast, sanitizer residue, or incorrect sparge conditions
- Why it happens:
Phenolic flavors sometimes start on the hot side, but many show up when wild yeast enters the beer. These wild strains create chlorophenols and other sharp compounds that taste medicinal or plastic-like. Incorrect use of chlorine-based sanitizers can also contribute. - How to avoid it:
Avoid chlorine-based sanitizers unless you thoroughly rinse with boiled or filtered water. Use no-rinse sanitizers correctly. Keep your fermenter closed and sealed. Remember that wild yeast falls downward into open containers, so cover your wort whenever possible. Treat your water supply. You can reduce Chlorine/chloramine by letting your water sit out overnight, boiling and cooling it prior to use, or adding one Campden Tablet to your brewing water and waiting 15 minutes.
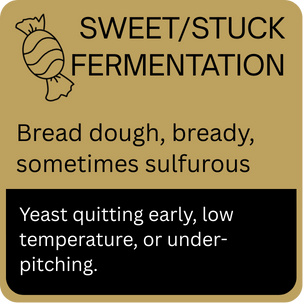
Sweet or Under Attenuated
- Tastes and aromas: sugary, syrupy, sweet wort
- Source: yeast quitting early due to contamination, shock, or nutrient issues
- Why it happens:
Although stuck fermentation is not always microbial, contamination can disrupt regular yeast activity and leave far too much residual sugar. This results in a beer that tastes unfinished, with heavy sweetness and low attenuation. - How to avoid it:
Pitch enough healthy yeast, use adequate nutrition, and ensure proper oxygenation before fermentation begins. If microbial contamination is suspected in your beer, the odds of salvaging the batch are slim.
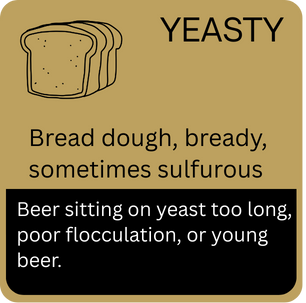
Yeasty or Autolysis
- Tastes and aromas: raw yeast, bready, rubbery, slight sulfur
- Source: yeast breakdown or poor handling
- Why it happens:
Autolysis occurs when yeast cells die and break apart. This releases sulfur compounds and harsh flavors into the beer. Long aging on the yeast cake or high fermentation temperatures can accelerate the problem. - How to avoid it:
Transfer beer off the sediment when aging for long periods. Keep fermentation temperatures stable. Pour bottled beer carefully so that the sediment remains in the bottle. Pro tip: Get in the habit of rinsing your bottle right after pouring. A little easy clean-up now saves time when you reuse the bottle.
Sanitation off-flavors always come back to preparation and discipline. The good news is that clean brewing habits dramatically reduce the risk. Once sanitation is dialed in, the final group of off-flavors tends to come from the one thing that affects beer from grain to glass: oxygen.
Oxidation and Packaging Off-Flavors
Even when the mash was perfect, the boil was vigorous, and fermentation went smoothly, the beer can still drift off course during packaging. Oxidation is one of the most common issues that can occur after fermentation, and it can alter flavor and aroma, making the beer feel stale long before its time. Oxygen is both necessary and dangerous in brewing. Yeast needs oxygen at the very beginning, but once fermentation starts, oxygen becomes the enemy. A small amount introduced at the wrong moment can create long-term damage that is impossible to reverse.


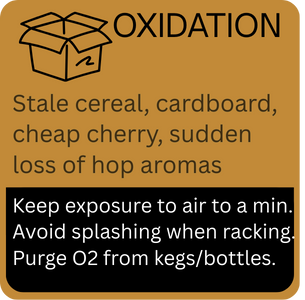
Oxidation
- Tastes and aromas: papery, cardboard, stale bread crust, muted hops, early staling
- Source: oxygen exposure after fermentation or during packaging
- Why it happens:
Hot wort absorbs oxygen quickly, but cold beer is just as vulnerable. Oxygen reacts with malt compounds and hop oils. These reactions create cardboard-like flavors, dull aromas, and contribute a stale taste, even when the beer is fresh. Oxidation problems often come from splashing during transfers, poorly sealed vessels, excessive headspace in bottles, or oxygen-rich environments during kegging. - How to avoid it:
Transfer beer gently with tubing that stays below the surface of the liquid. Reduce splashing at every stage. Limit headspace when bottling. Purge kegs with carbon dioxide before filling. Store finished beer cold to slow oxidation.
Papery or Stale
- Tastes and aromas: old paper, muted malt, thin finish
- Source: long-term exposure to oxygen, warm storage
- Why it happens:
This is the long tail of oxidation. Even if the beer was packaged well, warm storage or slight oxygen intrusion can nudge flavors toward staleness over time. The malt profile becomes dull, and the hop character fades. - How to avoid it:
Keep finished beer cold. Use oxygen-absorbing caps when bottling. Ensure caps, keg lids, and gaskets seal tightly.
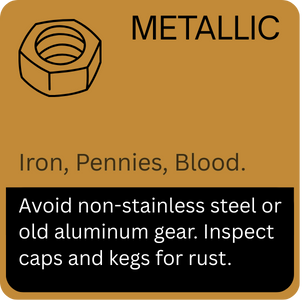
Metallic
- Tastes and aromas: pennies, iron, sharp mineral bite
- Source: packaging materials or water quality
- Why it happens:
Although metallic flavors often originate on the hot side, they can also appear during packaging. Bottle caps with damaged liners, scratched kegs, or metal components that are not stainless can leach metallic notes into the beer. - How to avoid it:
Inspect packaging equipment regularly. Replace worn components. Avoid contact between beer and reactive metals.
Light-Struck at Packaging
- Tastes and aromas: skunk, sulfur, burnt rubber
- Source: UV exposure during bottling or storage
- Why it happens:
Even if the beer is perfect in the fermenter, bottling under bright lights or storing it in green or clear bottles can trigger a light-struck reaction. Hop compounds interact with UV rays to form mercaptans. The result is the classic skunk aroma found in light-exposed beer. - How to avoid it:
Use brown bottles. Keep bottled beer away from windows and fluorescent lighting. Protect fermenters and kegs during storage.
Under Carbonated or Over Carbonated
- Tastes and aromas: flat or sharp carbonation bite
- Source: priming sugar errors, incomplete mixing, temperature issues
- Why it happens:
Although not technically an off-flavor, carbonation problems affect how flavor is perceived. Under-carbonation can make beer feel flabby. Overcarbonation can sharpen acidity or mask malt character. - How to avoid it:
Measure priming sugar carefully. Mix gently but thoroughly. Store bottles in an appropriate temperature range for conditioning.
Packaging issues usually come down to oxygen control, clean equipment, and thoughtful handling. At this stage, the beer is in its final form and cannot protect itself. Once oxygen or light steps in, the beer responds much faster than most brewers expect. With packaging covered, the last step is tying everything together so you can quickly identify problems and prevent them before they appear.
Building Sensory Skill
By this point, you can see how many different paths lead to off-flavors in beer. Some come from fermentation that ran too hot or too fast. Others trace back to ingredients that were past their prime. A few come from boil practices, and many of the most stubborn ones come from sanitation issues or oxygen exposure. Every off-flavor has a story, and learning to read those stories is one of the most valuable skills a brewer can develop.
The good news is that recognizing off-flavors is not a talent. It’s a skill learned through iteration. Take good notes to connect your tongue to your brain and teach yourself along the way. We didn’t learn to walk by running a marathon, you know..
Create a sensory routine.
. Start by tasting your beer at different stages. Taste it warm and cold, taste it before carbonation and after, and finally taste it young, then again after a week or two. Each phase has something to teach you. Small differences in aroma or flavor at the beginning often grow more evident as the beer develops, and those patterns become easier to track over time.
If you can, taste with other brewers. A small group can pick up far more detail than a single palate, and talking through what everyone is noticing helps sharpen your own understanding. This is one reason the Siebel Institute off-flavor kits are so effective. They give you clear, unmistakable examples of individual faults. Once you smell butyric acid in isolation, you never forget it. Once you taste acetaldehyde at full strength, the faintest green apple note in your own beer becomes obvious. Repetition matters, and every training session makes you a better brewer.
Add a little science
You can also train yourself using controlled comparisons. Open two bottles of the same beer side by side. Let one warm up. Pour one aggressively to expose it to oxygen. Take small samples from your own batches at different stages. These experiments teach you how flavor shifts with temperature, oxygen, carbonation, and time. Over the course of a few brews, these simple tests build more confidence than any textbook.
Throughout the process, your quick reference guide becomes a powerful tool. The infographic you keep near your brew day setup acts as a map. This article provides a longer explanation of each issue, but the guide helps you match a strange flavor to a likely cause in seconds. With both resources together, you will find that troubleshooting becomes more intuitive and less overwhelming.
The more intentional you are in tasting and evaluating your beer, the better it becomes. Off-flavors stop feeling like failures and start feeling like information. They teach you how yeast responds to stress, how ingredients age, how oxygen changes beer, and how your own habits influence the final product. When you understand off-flavors, you understand brewing on a deeper level.
With the fundamentals in place, all that remains is the final section, where we close out the article with a clear message.
Encouragement for Brewers
Every brewer runs into off-flavors at some point. It is part of the craft. No one brews a perfect beer every time, and even the best brewers in the world have batches that drift off target. What matters is how you use those moments. Off-flavors can frustrate you or teach you something valuable about your process. When you choose the second option, you grow faster than you ever expected.
The more you brew, the more you start seeing patterns. You learn how your system heats and cools. Learn how your yeast behaves at different temperatures. Find out which ingredients make your beer shine and which ones need a little more attention. With each batch, your confidence grows, not because everything goes right, but because you begin to understand why things go wrong.
Learning as you go.
That understanding is what allows you to make consistent, expressive, reliable beer. It also makes your victories sweeter. When you pour a pint that is clean and bright, and you know exactly how you got there, it feels earned. That is the heart of homebrewing. It is a mix of curiosity, discipline, patience, and joy. You get better by trying, tasting, adjusting, and trusting the process.
If you keep your brewing space clean, take care of your yeast, store your ingredients well, and pay attention to how your beer tastes at every stage, you will see off-flavors less and less. When they do show up, you will recognize them quickly and understand how to fix the issue in the next batch. Over time, the troubleshooting becomes second nature.
Remember that brewing should be fun.
There is something satisfying about turning grain, hops, water, and yeast into something you can share with people you care about. The more you learn, the more enjoyable it becomes. And every lesson, even the ones that come from a flawed batch, pushes you forward.
Use this guide along with the quick reference infographic to stay grounded on brew day. Let them help you learn the language of off-flavors so you can correct minor issues before they grow into larger ones. With practice, these skills become part of your brewing instincts.
Most of all, keep brewing. Keep experimenting. Keep tasting. Trust that your beer will get better with each attempt. Making great beer does not happen by accident, and now you have the tools to make your next beer your best beer.