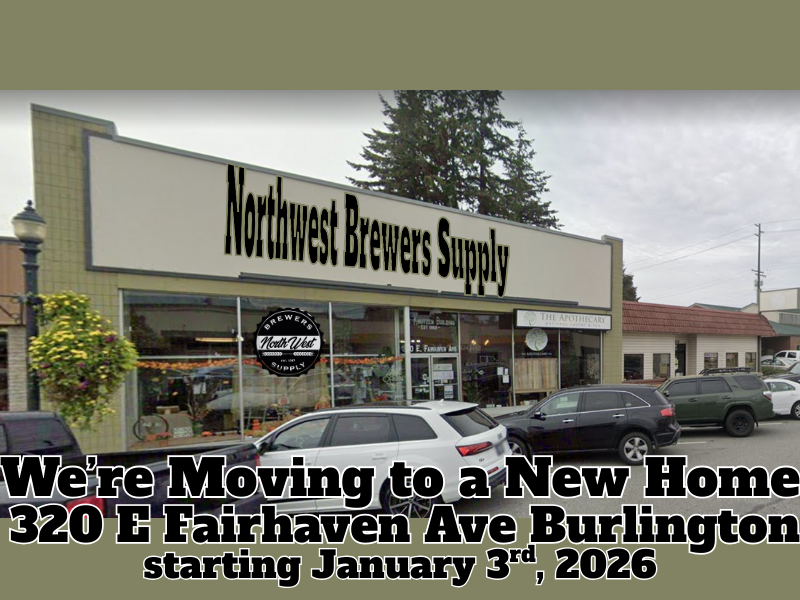
I’ve got some exciting news to share, and I want to be upfront about it:
Northwest Brewers Supply is moving to a new location! But don’t worry; we’re doing it our way:
The New address will be 320 East Fairhaven Ave, Burlington, WA 98233
We’ll be open at our current spot the whole time.
That means no interruptions, no downtime, and definitely no “closed for renovation” signs. You can still stroll in, grab your favorite grains, pick up some yeast, or chat about brewing just like you always do.
Here’s the reality: The brewing scene has faced some tough times lately. Breweries have closed, taprooms have fallen quiet. We’ve felt that impact, too. More homebrewing shops have closed their doors, leaving us the only store between Seattle and Canada.
But instead of letting it get us down, we’re choosing to adapt.
We’re moving into a smaller, smarter, and more efficient space that’s designed for the next chapter of brewing in the Northwest. Our new shop will feature a streamlined layout, a clearer flow, and a thoughtfully curated inventory that reflects what you really brew.
And since life seems busier than ever, we’re taking our classes online! That means you can learn at your own pace, whenever it suits you. We’ll offer pre-recorded lessons, live Zoom Q&A sessions, and guided kits to make brewing more accessible than ever.
So, what’s staying the same?
– Your access to top-notch ingredients – Our brewing advice – Our dedication to the Northwest brewing community
And yes, we’ll be open through the entire transition.
Now, here’s what’s changing:
– A smarter new space (opening January 3) – A fresh, more efficient layout – Online classes you can access 24/7 – More guided kits and QR-code learning tools – A renewed focus on helping you brew amazing beer at home (and wine, and mead, and cider too!)
We’ll keep running our current location while we work on getting the new space ready over the next few weeks.
When we open the doors to the new shop on January 3rd, we’ll be ready to roll. It’ll start with a soft opening, and we’ll keep adding more features each week.
The brewing world has gotten tougher, but so have we. TOUGHER BEER STARTS HERE.
Thank you for sticking with us. Thank you for supporting local. And thank you for keeping the Northwest brewing spirit alive.
I look forward to seeing you in the shop today, tomorrow, and at the new location in January!
Crack the Code: Malt COA’s
If you’ve ever looked at a malt COA and thought, “Cool… but what am I supposed to do with this?”, you’re not alone. A Certificate of Analysis (COA) can look like technical overload—but it’s actually one of the most useful tools in your brewing kit.
This page is your resource hub for making sense of the COA and using it to brew better beer, consistently.
🎧 Start Here: Listen to the Episode
In our latest podcast episode, “Crack the Code: Using Malt COAs to Brew Better Beer”, we break down what a COA is, when to actually use it, and how it can help you hit your gravity, improve your efficiency, and solve problems before they start. Whether you’re a beginner or brewing professionally, this is the guide we wish we had years ago.
👉 [Listen to the episode here](insert link)
📄 Download the COA Glossary
This free PDF explains all the acronyms and numbers you’ll find on a malt COA—in plain English. Perfect for printing out and sticking in your brew log or taping up near your grain mill.
Want to know which COA values matter most for your favorite beer styles? This reference sheet matches BJCP style categories with the extract, FAN, protein, and diastatic power numbers you should be watching. A must-have for recipe design and substitutions.
Ready to go deeper with your brewing? We’re launching a brand-new All-Grain Brewing Course at Northwest Brewers Supply—covering everything from mash schedules and water chemistry to reading COAs and refining recipes.
If you want to be the first to know when enrollment opens, sign up below and we’ll keep you in the loop.
Brewing is equal parts art and science—and when you understand your ingredients better, the process becomes easier, more consistent, and a lot more fun. These tools are here to help you turn that wall of numbers into better beer.
Questions? Want to share how you’ve used COAs in your brewing? Send us a message or stop by Northwest Brewers Supply—we’d love to hear what you’re brewing.
Summer Brewing: How to Master Warm-Weather Fermentation
Let’s say it out loud- nobody wants a banana-flavored IPA. I won’t allow it. If you’re brewing a Hefeweizen, a little isoamyl acetate can be charming, even expected. But that compound is the harbinger of doom for the rest of us, especially when your summer brewing setup lacks tight temperature control. The average brewer’s greatest fear? Opening the fermenter to a wave of fruity betrayal. It’s the stuff of nightmares. You start out dreaming of a crisp Kölsch or bright pale ale, and you end up with something that smells like a Jamba Juice crime scene. Welcome to warm-weather fermentation, where dreams go to ester.
Why Summer Brewing Requires Special Consideration
Summer is for sunshine, sandals, and backyard brew days, but it’s also when your yeast goes rogue. Most homebrewers learn the hard way that summer brewing requires a different mindset. When the ambient temperature climbs, so does the risk of fermentation going off the rails. Warm weather brewing is not just about sweating through your brew day; it’s what happens after the boil that can turn a great recipe into a hot mess.
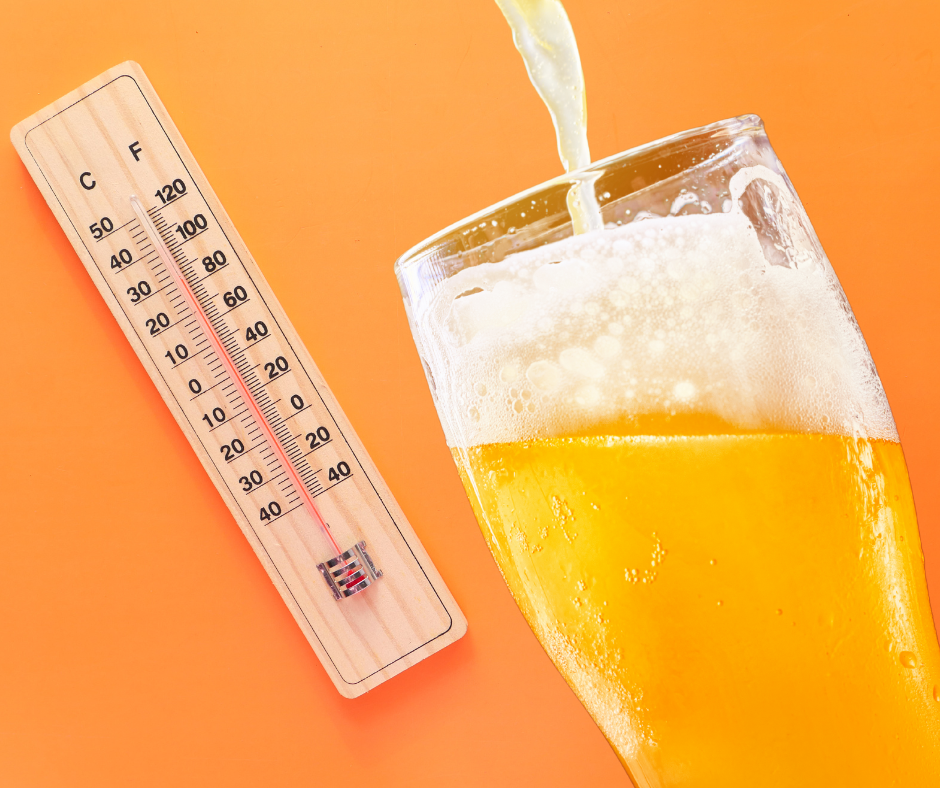
Summer Brewing Tips Quick tricks to beat the heat, even without fancy gear. Swamp Cooler Setup: Place your fermenter in a tub of water with a wet cotton T-shirt or cotton towel draped over it. Add a fan, and you’ll have evaporative cooling on a budget. Brew in the Morning: Start early to avoid the midday heat while boiling and chilling your wort. Ice Bottles in Rotation: To lower fermentation temperatures, freeze water bottles and rotate them in your water bath. Seek Shade or Basement Real Estate: Keep your fermenter off the garage floor and out of direct sunlight. A cool closet or basement is your summer MVP. Use Yeast That Likes the Heat: I’ll explain this further soon, but remember that some yeast strains were made for this weather. Pro tip: Keep a stick-on thermometer on your fermenter. If it’s reading over 75°F and your yeast isn’t built for it, trouble’s brewing.
Let’s break it down: yeast is sensitive. Fermentation temperature directly impacts the flavors it creates, and when things get too toasty, the results aren’t pretty. We’re talking fusel alcohols that taste like paint thinner, phenols that smell like Band-Aids, and esters that make your blonde ale taste like a fruit cocktail. Left unchecked, warm temps can stall fermentation, stress your yeast, and make your beer taste like something that should come with a warning label.
This doesn’t mean summer brewing is doomed. It just means you’ve got to plan like a pro. With the right strategies (and a slight attitude adjustment), hot-weather brewing can actually open up some fun new possibilities.
The Science Behind Warm-Weather Fermentation
Let’s talk yeast. These microscopic sugar-gobbling goblins are the lifeblood of your beer, and they have a comfort zone. Most ale yeasts like it between 60-72°F. Anything above that, and you’re asking for chaos in a carboy.
Yeast Metabolism and Temperature Ranges
Yeast is a living organism. Like most of us, it behaves differently when it’s too hot. Fermentation temperature affects the pace of metabolism, the production of esters and phenols, and the risk of producing higher alcohols (fusel alcohols). At warm temps, yeast kicks into overdrive, fermenting faster, yes, but also throwing off more byproducts. Think: isoamyl acetate (banana), ethyl acetate (solvent), and other uninvited guests to your flavor party.
And here’s the thing: faster isn’t always better. Quick fermentation may seem like a win in the summer, but it often means stressed yeast and unpredictable results. That classic crisp pale ale you love? It wasn’t designed to be fermented at 78°F in your laundry room.
What Happens When It Gets Too Hot? So what’s the worst that could happen? Well… Fusel Alcohols: Harsh, solvent-like flavors, or too boozey. These come from high-temperature fermentation, especially in the first 48 hours.
Excess Esters: A little fruity? Sure. A fruit basket? No thanks.
Unbalanced Phenols: Think clove, pepper, or worse, Band-Aid. Unless you’re brewing a saison or a Belgian-style beer, that’s probably not what you’re going for.
But knowledge is power. When you understand what’s happening inside that fermenter, you can start making choices that play to the strengths of summer brewing instead of fighting the heat every step of the way.
The First 48 Hours: Where Good Beers Are Made (or Ruined) Warm-weather brewing starts here. Nail this part, and the rest is gravy. The first 48 hours of fermentation are the most sensitive and impactful for flavor development. • Your yeast isn’t just converting sugar into alcohol- it’s building the beer’s entire personality. Here’s what’s happening under the hood:
Lag Phase (0-12 hours) •Yeast is waking up, absorbing oxygen, and building cell walls. •No bubbling yet-but this is when temperature matters most. Hot wort = stressed yeast from the start. •Pitching at 72-75°F may seem fine, but if ambient temps climb and there’s no control, you’re pushing 80°F internally.
Exponential Growth Phase (12-48 hours) •Yeast cell count is doubling rapidly. Fermentation takes off. •Most esters, fusel alcohols, and phenols are formed during this phase. •Temperature spikes during this time will shape your beer’s flavor profile: clean, crisp… or banana bread soaked in solvent.
Why Summer Brewing Risks Spike Here Ambient temperatures are highest during the day. If your fermenter is in a hot garage or kitchen, internal temperatures may be 5-10°F higher than the room’s. Most temperature-control techniques (ice baths, swamp coolers, etc.) work best if deployed before fermentation ramps up. Tips to Get This Phase Right in Summer Brewing: •Cool your wort below your target fermentation temp. Aim for 64-68°F for most ales, even if your yeast says 70-72°F. •Use a starter or rehydrated dry yeast so your yeast hits the ground running. Control temps aggressively for the first 2-3 days. After that, it’s safer to let things gradually warm. •Keep a thermometer on the fermenter, not just the room. A stick-on LCD strip is cheap insurance.
Pro tip:Want cleaner flavors? Chill fast, pitch cool, and keep your fermenter in the shade or water bath during the first 48 hours. That’s it. That’s the secret.
DIY Hacks for Controlling Fermentation Temperature
Let’s face it, most of us don’t have a fermentation fridge, temperature controller, or dedicated cool room that smells faintly of hops and victory. And that’s fine. Summer brewing doesn’t require high-end gear. It just requires a little resourcefulness and the willingness to fight the heat with whatever’s in your garage or freezer.
Swamp Cooler Method: The Classic
How it works:
Place your fermenter in a shallow tub or bucket.
Add water halfway up the side of the fermenter.
Drape a cotton T-shirt or cotton towel over the fermenter so the bottom sits in the water.
Point a fan at it. As the water evaporates, it cools your fermenter.
Bonus: Avoid the temptation to add ice to your water bath. This will negatively impact the efficiency of an evaporative cooler as the colder water must heat up to evaporate.
Ice Bottles in Rotation: Low Effort, Big Results
Freeze a few 1-2 liter water bottles and rotate them into your water bath every 12 hours. Keep a couple in the freezer at all times, and you’ll have a shockingly effective DIY temperature control system.
Pro tip: Don’t use loose ice- it melts too fast. Bottles are reusable, less messy, and easier to manage.
Cool Spots and Creative Insulation
Sometimes the best solution is… location.
Basements or crawl spaces: Even in summer, they stay cooler.
Closets on the north side of the house: Avoid sun exposure.
Wrap the fermenter in a reflective blanket or bubble foil insulation to slow temp spikes.
Elevate fermenters off warm garage floors. A piece of foam, cardboard, or even a towel between the fermenter and the concrete can prevent heat transfer from below.
Thermal Wraps & Temperature Strips
These small upgrades are worth every penny:
Stick-on LCD thermometers are cheap and accurate enough to track actual beer temperature, not just room temperature.
Insulated fermentation bags or wraps: Help regulate temperature swings, especially overnight.
Reminder: Knowing your temps and adjusting is better than guessing and ending up with a fruity mess.
Hack
What You Need
Temp Drop
Notes
Swamp Cooler
Tub + Towel + Fan
5-10°F
Cheap, easy, surprisingly effective
Frozen Bottles
2-3-L water bottles
+Swamp Cooler: +2-5°F
Rotate Daily, no mess
Shady Spot
Basement, north closet, etc.
3-8°F
Avoid garages & Sun-soaked kitchens
Lift the fermenter
Foam pad, towel, wood
1-2°F
Floors radiate heat, especially concrete
Insulated Wrap
Reflective or thermal bag
2-4°F
Slows spikes, especially at night
Temp Strip
$2 stick-on LCD
Infinite Peace of Mind
Know your temps. Always.
Rule of thumb: You don’t need to hit perfect numbers, avoid extremes, especially in the first 48 hours.
Hot Weather, Cool Beer: You’ve Got This
Summer brewing doesn’t have to mean banana bombs, fusel firestorms, or hiding your carboys in the bathtub. With a bit of planning and the right yeast, warm-weather fermentation can actually unlock a whole new set of styles and flavors. Whether you’re leaning into the funk with a saison, flying through fermentation with Kveik, or dialing in your DIY swamp cooler, you’re gaining skills that make you a better brewer year-round.
So don’t fear the heat-brew with it.
Ready to put your skills to the test? We’ve got warm-fermenting beer kits ready to roll, gear that won’t melt in the sun, and hands-on brewing classes that’ll help you master your next batch, no matter the season.
You crack open your latest homebrew, pour it into a pint glass, and hold it up to the light—and it looks like a snow globe. Cloudy with a chance of yeast. Is it a murky mess or something else? Some folks love the look of a hazy brew. Others panic like their batch has just failed a chemistry final. So what gives? Is haze the enemy of good beer, or is it just part of the charm?
Clear beer elevates the visual aspects. Visual appeal is a primary factor in elevating the anticipation of enjoyment. If it looks good, it’s going to taste good. Clear beer is a mark of a quality craftsman with attention to detail.
The truth is, a hazy beer might taste just fine—or it might signal something gone sideways. Whether you’re chasing that crystal-clear West Coast IPA or just curious about why your pale ale looks like murky pond water, understanding beer clarity is the first step to dialing in your brew.
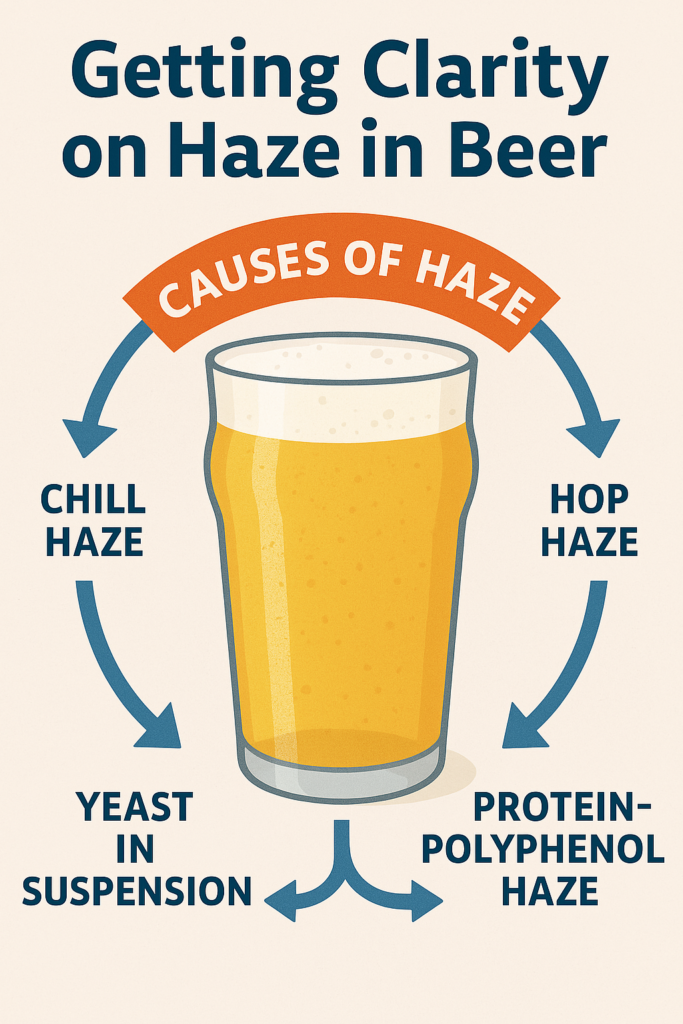
SO WHY IS MY BEER CLOUDY?
Most haze issues reveal themselves after fermentation and the beer is chilling (literally and metaphorically). A cloudy pint can be chalked up to three primary culprits: yeast, proteins, and polyphenols. There is a fourth reason: in more dramatic cases, bacterial infection.
Let’s break them down and get a little clarity here!
1. Yeast That Refuses to Settle Down
Yeast can be like that friend who overstays their welcome. Some strains are courteous and flocculate—meaning they clump up and fall to the bottom when the party’s over. Others just hang around, floating in your beer and photobombing your Instagram shots.
Choosing a high-flocculation yeast strain is a good first step toward better beer clarity. But don’t get married to the idea that high floculation is the only way to go. Even with a lazy strain, you can let it chill! Giving your beer some cold conditioning time in the fridge can encourage those micro-squatters to settle out.
Pro tip: Yeast visibility is a no-go if you’re brewing a kölsch or cream ale. Pick a strain that knows when to leave. If your beer is still cloudy, consider a post-fermentation fining agent like dual-fine or gelatin.
2. Protein and Polyphenol Problems
Picture this: you toss a handful of cooked spaghetti and a sprinkle of glitter into a jar of water. The result? It’s anything but clear. This is similar to what happens in brewing; the proteins derived from grains, along with the polyphenols from hops and the tannins from malt, eagerly bond together, creating a murky haze in your beer.
These particles often show up as chill haze—meaning your beer looks clear at room temperature but goes cloudy when it’s cold. If the haze sticks around at any temperature, you’re dealing with permanent haze.
If you’re into the Hazy New England IPA, the high hopping rates during fermentation means more polyphenols to bond with high-protein grain bills. The perfect recipe for permanent haze.
Commercial breweries spend serious coin trying to prevent this. As a homebrewer, you’ve got a few simpler options:
Add Irish moss or whirlfloc at the end of the boil
Get a solid hot break during the boil (vigorous boiling is your friend)
Rapidly chill your wort for a good cold break
Take a look at your grain bill. Higher-protein malts like 6-row varieties can cause clarity problems. Consider using ingredients like rice or corn, with fewer proteins overall. Alternatively, you can try enzyme additives like Clarity Ferm, which prevents some of the bonding of proteins and polyphenols, protecting against chill haze.
3. When It’s Not Haze—It’s Infection
Not all haze is innocent. Sometimes, it’s your beer’s way of screaming, “Something’s wrong!” Infections caused by wild bacteria can cloud your brew and serve up off-flavors ranging from buttery popcorn to gym sock soup.
Common culprits:
Lactobacillus: Brings unwanted tartness unless you meant to make a sour
Pediococcus: butterbombs and thick, ropey textures
Coliforms: Yep, those bring the aroma of old vegetables and regret
If your beer starts getting hazy after bottling and tastes funky, it might be time to review your cleaning game and retire a few questionable plastic fermenters. Scratches in plastic are a great place for bacteria to hide out and wait for the perfect conditions.
HOW TO IMPROVE BEER CLARITY IN FUTURE BREWS
Alright, so now you know why haze happens. What can you do about it?
Settle the Yeast:
Cold-crash your fermenter before packaging.
Use fining agents like gelatin or DualFine.
Let gravity do its thing—sometimes, a little patience is the best filter.
Tackle Proteins and Polyphenols:
Try a protein rest if you’re using wheat or other high-protein grains
Use kettle finings during the boil.
Practice solid whirlpooling to remove hop debris.
Keep your boil rolling and your wort chilling fast.
Be a Clean Freak:
Sanitize everything—like, obsessively
Don’t reuse scratched plastic gear (bacteria love those micro-homes)
Watch for odd flavors and haze that worsens over time.
CLOUDY STYLE OR UNINTENDED MISTAKE?
Sometimes, a slight haze is precisely what the style calls for. Hefeweizens, New England IPAs, Belgian wits—all wear haze like a badge of honor. But for most other styles, beer clarity is part of the charm. It signals care, precision, and a bit of brewing finesse.
You don’t have to chase perfection in every pint. But knowing how to clear things up can help you make informed choices—and better beer.
After all, a clear beer lets the drinker see what you’ve brewed… no filter necessary.
Want to know more about achieving clarity in the beer? Swing by Northwest Brewers Supply for tips, gear, and classes that’ll take your brew from cloudy to show-off-worthy.